TM 9-6115-664-13&P
4-17. EXTERNAL MUFFLER COVER MAINTENANCE
This task covers removal, inspection, testing, and installation
INITIAL SETUP
Tools:
Equipment Condition:
Shop Equipment, Automotive Maintenance
APU Shut Down
and Repair (Item 1, App. B)
NATO Plug Disconnected
Parts/Materials:
Adhesive, Silicon (Item 2, App. E)
A.
REMOVAL.
WARNING
Muffler and cover may be hot. Use
caution when handling to prevent
bums. Allow parts to cool before
removing.
NOTE
Discard and replace all lockwashers
and
locknuts
when
removed.
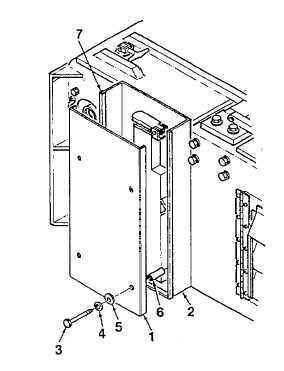
Remove muffler cover (1, Figure 4-7)
from housing (2) by removing four
screws (3), lockwashers (4), washers
(5), and spacers (6).
B.
INSPECTION.
1.
Inspect cover for dents, cracks, warping, or other
damage. Inspect painted surfaces for chips,
scratches, bare metal, roughness, or corrosion.
Figure 4-7. Muffler Cover
2.
Inspect muffler for damage and corrosion. Replace or repair as required (Para. 4-40).
3.
Inspect insulation strip (7) for damage. Ensure secure attachment. Replace as required using adhesive.
C.
INSTALLATION.
1.
Mate muffler cover (1, Figure 4-7) to housing (2) and secure using four screws (3), lockwashers (4), washers (5), and
spacers (6).
2.
Connect NATO plug to receptacle and secure using strap.
4-50