TM 9-6115-664-13&P
4-20. LOCAL CONTROL PANEL ASSEMBLY MAINTENANCE
This task covers removal, inspection, testing, and installation
INITIAL SETUP
Tools:
Equipment Condition:
Shop Equipment, Automotive Maintenance
APU Shut Down
and Repair (Item 1, App. B)
NATO Plug Disconnted
Parts/Materials:
Adhesive, Silicon (Item 2, App. E)
Gasket, Bulk (Item 4, App. E)
A. REMOVAL.
WARNING
Disconnect
electrical
cable
from
NATO receptacle before performing
maintenance
on
the
electrical
system. Failure to do so can result in
electrical shock.
NOTE
Discard and replace all lockwashers
and locknuts when removed.
1.
Open top rear cover on APU enclosure by turning
latches.
2.
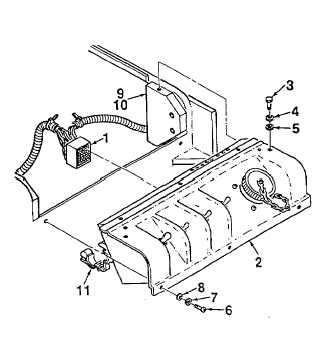
Disconnect electrical connector (1, Figure 4-10)
from rear of control panel assembly (2). Remove
wiring harness from back of panel by disengaging
plastic clamp (11).
3.
Remove control panel assembly (2) from panel
mounting blocks (9) by removing two screws (3),
lockwashers (4), and washers (5).
4.
Remove control panel assembly (2) from APU
enclosure
by
removing
three
screws
(6),
lockwashers (7), and washers (8).
5.
Block (9) is held in place by two screws (10), that
also secure tie-down ring. Remove block only if
replacement is required.
Figure 4-10. Local Control Panel
(Sheet 1 of 2)
4-53