ARMY TM 9-6115-641-24
AIR FORCE TO 35C2-3-456-12
4-1-4. Assembly. - Continued.
c.
d.
e.
f.
g.
h.
i.
j.
k.
l.
m.
n.
o.
p.
4-6
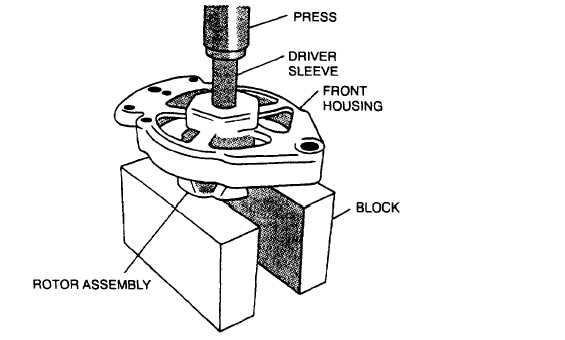
Using arbor press, press front housing (29) over rotor assembly (28) until inner bearing race contacts shoulder
on shaft, refer to Figure 4-8.
Figure 4-8. Assembling Front Housing to Rotor
Position pulley spacer (26, Figure 4-7), woodruff key (27), fan (25), and pulley (24) on rotor assembly (28)
shaft.
Install Iockwasher (23) and nut (22) on rotor assembly (28) shaft. Torque nut 35 to 50 ft-lbs (47 to 68 Nm).
Position stator (21) in front housing (29) with stator leads at top and notches in lamination aligned with bolt
holes.
If removed, install retainer (20) in rear housing (19).
Position rear housing (19) over slip rings of rotor assembly (28) with front and rear housing bolt holes aligned,
and stator leads extending through openings at top of rear housing (19).
Install thru–bolts (18) and tighten evenly. Torque bolts 50 to 60 in–lbs (5.6 to 6.8 Nm).
If necessary, remove thru-bolts (18) and rotate rear housing (19) and stator (21) to align housings as match
marked on disassembly. Reinstall bolts and torque evenly 50 to 60 in–lbs (5.6 to 6.8 Nm).
Insert strap (13) of rectifier bridge (17) through slot in diode–trio (16) body. Bend strap (13) over B+ terminal
and secure with cone nut (12).
Apply thin film of heat sink compound (Item 7, Appendix C) to back of rectifier bridge (17) and mating area of
rear housing (19).
Install diode-trio (16) and rectifier bridge (17) on rear housing (19) with bolts (15) and connect stator leads with
bolts (14). Remove tags.
Install voltage regulator (10) to rear housing (19) with insulating washers (11) and bolts (9).
Install brush assembly (8) and strap (7) with nuts (6).
Position felt gasket (5) in back cover (4) and install back cover on rear housing (19) with bolts (3).


